Replacement of Hydrovac on Chassis
1. Reassemble Hydrovac unit in the frame brackets and tighten bolts and nuts
evenly.
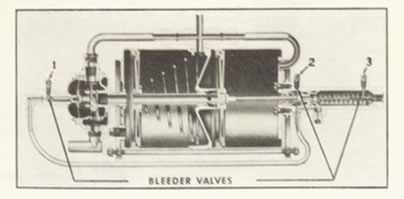
CAUTION: Be sure bleeder valves on Hydrovac unit are vertical.
2. Connect air cleaner and vacuum hose connections.
3. Connect hydraulic lines from hydraulic master cylinder and wheel cylinders.
4. Bleed Hydrovac unit according to instructions under, “Bleeding the
Hydrovac”.
Bleeding the Hydrovac
The Hydrovac unit must be bled at all three bleeder valves before at tempting
to bleed at the wheel cylinders.
Because the hydraulic line from the master cylinder can be connected to the
Hydrovac at two different points, the order of bleeding the Hydrovac bleeder
valves will vary.
Use the following method of determining proper bleeder valve sequence:

1. If the hydraulic line from the master cylinder connects to
the Hydrovac unit at the control valve, bleed the hydrovac in 1—2—3
order as shown above.
2. If the hydraulic line from the master cylinder connects to the slave cylinder,
bleed the Hydrovac in 2-1-3 order as shown above.
3. Bleed vehicle hydraulic brake system in usual manner.
NOTE Bleed the Hydrovac and the wheel cylinders with a dead
motor.
Page <23>